Orangepaint Factory is your one stop shop for all your custom needs. We can customize anything from cars, trucks, motorcycles, boats, helmets, guitars, or whatever else paint will stick to! Our services include but are not limited to custom paint, airbrush artwork, graphics, murals, pinstriping, flames, metal-flake, pearls, candies, old school flat colors, or anything else you can think of.

If you can dream it, we can make it a reality!

WIP-Moose Mask, Day 3


I decided I wanted to darken the background so I had to mask the entire image to get ready for painting. I used fineline to mask the edge and then filled the inside with masking tape.


Here you can see the darker background. I also started adding the snow. It is hard to see but there are stars in the sky background.


I modified the design a bit, because the client wanted a smaller sign than in the original design, so I had to add the road and background.


Here are some pics of the final mask with a hefty coat of clear. A little buffing and the mask is ready for combat.


WIP-Moose Mask, Day 2


To create the Moose text, I layed down transfer tape and cut out the lettering. First I had to spray the text area with a light blue. When the paint is dry I place a piece of acetate in the middle of the logo, I then sprayed a blue color that is a little darker than the previous blue on the bottom of the text creating a horizon line in the middle of the Moose logo. Flipping the acetate mask around I then sprayed white above the blue horizon line. This creates a icy effect.


Here you can see the effect. Later I will come in and add some white hotspots to make the logo jump out.


Next I start by masking off the road. You can see the sign is also masked off in the background. I want to add texture to the road, to make it look like pavement.


I start with a grey and I spray a stipple effect on the road. To create this effect, I lower the air pressure to about 10lbs. I also pull the needle out a little bit to allow for more paint to come out and I spray the entire surface. Make sure you hold the airbrush back at least 10 to 15 inches when you are spraying.


Making sure the paint is dry, I mask off the road and paint the line on the road. Here I used 1/8 fineline tape and filled in with masking tape.


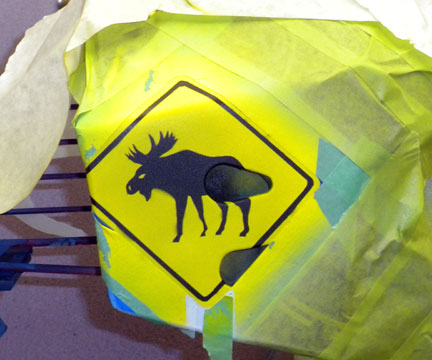
To create the sign, I mask off the entire area and the only piece that is visible is the sign. It is ready and I  paint it yellow. When filling in large areas, take your time and allow the paint to dry.


I then mask off the area and spray the black. When creating stencils I usually size the images using my computer or a photocopier. I take the image to my light table and it is very easy to cut out the stencil. I used 2in masking tape as a stencil.


I now add the bullet holes. Bullet holes are fairly easy to create. Don't overdo and add too many bullet holes.


Here you can see a close-up of the bullet hole. I cut two stencils to create this effect. The first is the round hole and the other creates the stressed metal effect. Add a couple freehand strokes and you have a bullet hole. 

First  I spray the stressed metal stencil with a grey. I center the circle stencil and paint the hole with transparent black. While I still have the black, I freehand a half moon stroke above the hole. Next using transparent white I spray a similar stroke on the bottom side of the hole. I continue until all bullet holes are complete.


Here  you can see the sign coming together and I also have started on the grass effect. Later I will add snow you enhance the effect. When painting the grass, I created a similar effect that I used on the moose. I wanted both sides to have a stylized look. You also see the road that look complete but I later repainted it. I noticed as I was driving my son to hockey practice that I had the passing lines wrong, so I repainted them. You can see the changes in a later photo. 


I did not complete the antlers earlier so it was time to move back to the other side and mask off the antlers.


Once I painted the black on the antlers, I removed the mask and let the mask sit so it could completely dry before I move on.


WIP-Moose Mask

I have finally started on Zach's mask. He has his first home game on Friday and I would like to get the mask done for the game. The team will also be wearing their new jerseys that have this logo. After taking the mask apart and putting the pieces in a ziplock bag, I mask the back using 3m masking tape.


My next step is to sand the clear off the mask. This is a brand new mask so I do not need to do any extra repairs or prime. I will just sand using a grey scotch pad. Once sanded, I clean the mask using a degreaser and wipe off with a tack rag.


Next using blue I spray my first coats. I let it dry and then go over the mask again with a pearl blue and finally a darker mixture to give it depth. I did not go too dark here because I did not want to overdo the color. I will come back at a later point to darken if required.


The first step is to start the transfer process. I decided to use 3m transfer tape as my mask material. Using my light table I put the tranfer tape over a inkjet print of my design.


Here you can see the image that I traced out on the transfer tape. Be careful when you peel the masking tape away from image. This will give me the exact image that I want to paint.


I have placed the 3m tranfer tape on the mask making sure it is properly aligned. The toughest part of any mask is designing around the mask holes.


I prefer using xacto knife to cut the mask. Here you see the moose color areas, all cut out and ready to paint. I use autoair paints for this entire project.


Once the color is painted I and completely dry, I pull the tape material off and get ready to paint the black. I lay another piece of transfer tape on the mask area and cut out the black areas. I pull away the pieces that will be painted and I start the paint process again. It is important to make sure the paint has time to cure before you remask.


So here we are. This is all I plan to complete for today. Tomorrow I will continue the painting as there are a few more hours before I can clear.

The most important part in any project is your plan of attack. If you don't properly plan your painting/masking process, you could put in a lot of extra hours in a project. Unnecessary hours will kill your profits. 

I will post progress in the next day or so.

d

Back to the Drawing Table

I worked on a few more sketches again today. I realy did not want to paint the same design on both sides. I thought of putting the sign. Zach hasn't gotten back to me yet so we will see if this is the final design.


My Son' Goaliemask

It was starting to look like I wasn't going to get a chance to paint another mask for my son. He attended a few camps and he has the skill to play at a higher level but it was not looking like there was a team that had a open spot.

He is now playing for the Grand Lake Moose and they have a pretty cool logo. They are also getting new jerseys so he will look sharp with the custom mask. I have also been asked to paint the other goalies mask so I will probably paint something simple and get added as a sponsor. That will give me ad space for year.

I grabbed some of Zachs ideas and put a few sketches together This looks like it will be the winner. I will start prepping the mask tomorrow. I just bought a new mask for him so all I have to do is mask, sand with 800 grit and paint. I will post pictures and comments as I go.

Long Weekend Fire


It was another quiet week. Today was the first time all week that I got my airbrushes out and i thought I would practice a bit. I have a mask to paint but today I just wanted to play.


I grabbed my old garbage can, cleaned it off and decided to practice some flames.
I use auto air paints on all my work. They spray good and there is a good variety of colors. I also find the price reasonable.

Flames look easy but it is not so easy to make them look real. I also tend to overwork them and that is the last thing you want to do. I have been practicing and although they are getting better, I am still not happy. Practice makes perfect.

Here are two pics of the garbage can that I painted. I did not prep the can in any way. I probably should have sanded it down a bit but I wasn't too worried about the scratches. It was the practice I was more interested in.

Flames are a lot of fun to paint. The trick is to build in layers and the true secret is using Candy colors to create the depth of the flames.


d


Quiet Sunday

Another weekend gone. I woke up today to a beautiful day. The plan was to go for a ride in the afternoon.

I finished my how to article for Airbrush Magazine this morning. I will post it later this week.

Overall, it was a good weekend. Did some painting, went for a good ride with some friends, played hockey and had a few beer.

It looks like I will have a quiet week. I have not started my sons mask yet, so I have to design and paint his goalie mask. I will probably start tomorrow. I am pretty excited about it. I was not sure if I was going to get another chance to paint one for him.

This is the bullet skull illusion that I painted earlier this year. I recently created a article on how I painted it. A link to the article will be available soon.

Fire Skull

I got home yesterday and I was too tired to paint. I had work to do, but my mind was not ready. I probably should have worked on the goalie mask I have to paint. I need to strip, mask and wetsand so I can get started on the painting. I will do that tomorrow.

I did work on a How to article for Airbrush Magazine. It's not finished yet but all I have left is to edit a few lines. I will post it here in the next day or so.

Today the plan was to go for a ride but instead i spent the day cleaning up my computer. Late in the afternoon I decided to go down to my studio and paint for a while.

This is the pic that I painted. I have been working on mastering fire effect. Not a easy task but it is getting a little easier. Practice, practice, practice. This time I decided to incorperate a skull in the fire, to see if I could pull it off. I am reasonably happy with my first attempt.

I painted this using Autoair paints. I mix the paint according to AA recommendation and it works reasonably well. I spray the paint at about 50lbs pressure. I find this works best for me. The only thing you have to watch is tip dry. I pinch the paint off the tip of the airbrush, fairly often and although you have to be careful not to bend you needle, this works well.

I will cover more information on AA paints and how I use them, in a later blog.